Are you faced with a boring landscape? Or worse yet, an empty yard or overgrown/rundown garden? Here's how we tackled my MIL's yard, one phase at a time, from the beginning.
My MIL bought her house in January 2022 about 8 miles north of us, after downsizing from her previous home. I don't have photos of the house at the time, but it's easy to describe.
- The front yard consisted of two large maples near the street, a large clump of daylilies where the driveway meets the sidewalk, hollies scalped into large balls by the HOA landscape crew (with leaves only on the tips of branches) and scraggly, weedy junipers.
- The yard on the right side only boasted two hollies and a strip of pine straw along the house.
- The back yard had a small patio, enough only for two small chairs, which was edged on either side with pine straw.
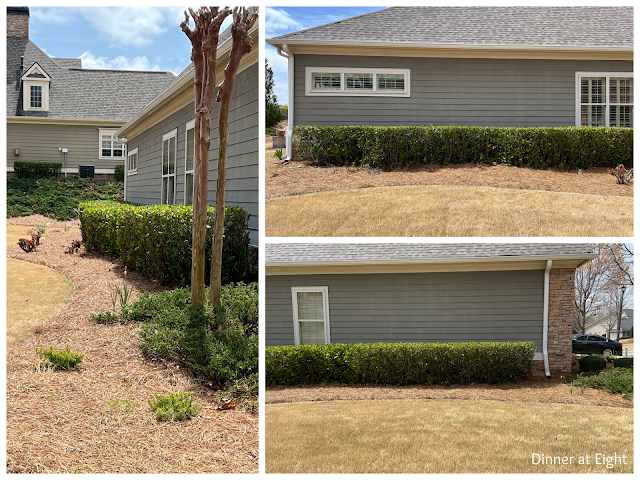
- The yard on the left side had overgrown laurels planted too close to each other down the entire width of the house, fronted by a row of loropetalums, three rose bushes which managed only a few flowers, and one crape myrtle. All the shrubs had been repeatedly sheared rather than pruned. For a good explanation of how to prune see Fine Gardening's Guide to Pruning.
Although the house was 5 years old at the time, it essentially only had its original builder landscaping. Doesn't sound enticing, does it?
Phase I
In the first phase, my MIL installed a large walled patio in the back and removed the row of loropetalums, several small hollies in the front of the house, and one of the hollies on the right side. She also filled in low
spots in the lawn and added pieces of sod.
Phase II
In the spring of 2023, I drew up a plan for the front, back and right side which she presented to the HOA for approval. I had designed a landscape that featured a variety of trees and shrubs and plenty of perennials. Since my MIL was a novice gardener, I selected plant material that would have the colorful interest she wanted, but which would not require a large amount of maintenance.
Then off we headed to the garden center. While I often buy my own plant
material from big box sources, if you're just starting in gardening or
landscaping, I recommend seeking out your local garden centers. They're
staffed with people knowledgeable about the varieties that will thrive
in your growing zone and can suggest alternatives with the features you want. My MIL's garden is located in zone 7b.
The front yard and garden are in partial shade from the trees and the house. There we divided the existing daylilies and installed a dwarf weeping Japanese maple, dwarf gardenias, aspidistras (cast iron plant), polygonatums (Solomon's seal), and two dozen daffodils, all seen in the photo above.
We planted several types of hostas,
We planted two smaller-sized golden junipers between the crape myrtle and the maple tree, ready to grow into the space where we plan to remove the four large, scraggly junipers.
We transplanted the daylilies we had divided to the other side of the driveway where they and more of the daffodils will blanket the space in front of the bench in seasonal color. This area is sunny for most of the day.
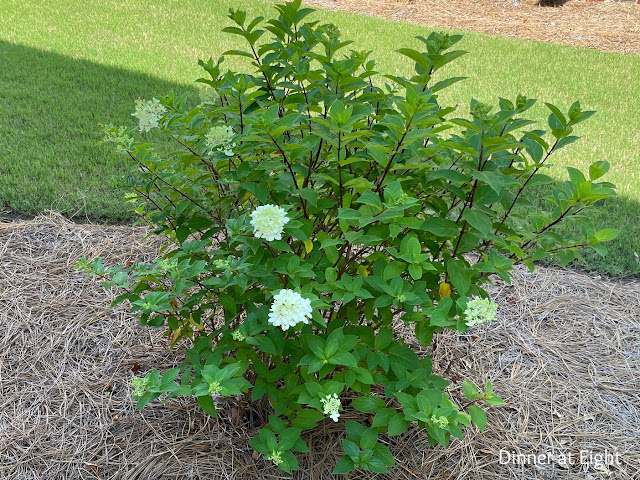
There's still a holly behind the bench; with a bit of fertilizer it's looking healthier so we've left it for now. Behind that we planted a limelight hydrangea to enliven the area.
The right side of the house has morning shade and afternoon sun. Two each of daylilies, sedum 'Autumn Fire', veronica 'Moody Blues', and allium 'Millenium' were planted along the house to provide a variety of sizes, flower colors and leaf shapes. At the end of the narrow bed is another hydrangea. A few transplants from my garden did not return this spring.
The tall yellow flowers belong to rudbeckia nitida 'Autumn Sun', a tough, well-behaved native coneflower that will help transform her summer garden into a paradise for pollinators.
Next to the patio we placed a lovely camellia that will eventually provide privacy as well as beautiful flowers.
And finally on that side we installed a tall Japanese maple to shade part of the patio. It has already grown about two feet since we planted it. We'll remove the stake once summer's thunderstorms are past.
The other side of the patio is in full sun throughout the day. There we planted a red-leaf Japanese maple which won't get as tall as the green one, another camellia to provide color and privacy from the common area, the tall rudbeckia, several irises and shasta daisies 'Becky'. We had planted other perennials in this area but they didn't survive the winter (or the HOA's landscape crew).
In this phase, which was just completed, we addressed the left side of the house. The collage below shows the monotonous hedge of laurels and sad rose bushes. Regular shearing lost the natural shape of the shrub. Unless you need a practical hedge, shrubs should
be spaced appropriately for their growth pattern. This area receives only morning sun; in the afternoon it is in deep shade cast by the house.
Because this curved bed is greater in depth than the one on the other side, I designed a progression of shrubs of varying heights and structural interest, which are primarily evergreen varieties (but not conifers). They are planted at different distances from the house. Several will bloom seasonally. A white viburnum anchors this end, which will get to be 7-8 ft high, while a red camellia anchors the corner of the house closer to the street. The camellia will reach 6 ft or so. The shrubs between them include an aucuba japonica 'Picturata', hydrangea 'Endless Summer', pieris japonica 'Katsura' and 'Tiki', an azalea, and a pair of boxwoods.
In the center by the dining room windows we planted a native cornus florida (dogwood).
To provide color in the shade I chose hosta cultivars (cvs), heuchera cvs, and heucherella cvs (hybrids of heuchera and tiarella) that have colorful leaves as well as flowering astilbe cvs. Daffodils will be planted here in the fall.
Beneath the maple we clustered heucheras and brunnera 'Jack Frost'; the lower limbs of the maple were previously removed.
This side now has a more interesting mix of plant material, compared to the before picture in the collage above. (I took the Phase III photos before the entire bed was mulched with pine straw.)
During this phase we also added more perennials to the areas we had planted last year. The front garden was enhanced with heucheras and brunneras. The daffodils will push up among them in the spring.
We're planning a Phase IV which will entail more perennials and seasonal bulbs in the fall or spring. And of course she has continued to plant colorful annuals in pots on her porch and patio.
Thank you for joining me on a tour of my MIL's garden! If you'd like to see how I've transformed my yard and gardens, please visit The Backyard Landscape — First Phase or search for “gardens” under Categories in the sidebar. I hope I've inspired you to make changes to your yard or garden, one phase at a time.


Looking forward for the transformation of your garden. Thank you for your visit to leave a comment. it means a lot to me Sandra ji.:)
ReplyDeleteThank you, it always looks a bit bare when you start out, but with good care everything should grow!
DeleteWhat a lovely transformation of your MIL's gardens Sandra! You have chosen a wonderful variety of flowers and shrubs that I imagine will be even more beautiful once they have filled in a bit. I will be in Phase I here next summer and I'll be curious to see how your MIL's plants fare over the winter and I hope you post an update. Thanks so much for the tour!
ReplyDeleteThanks, Kim! Tackling the project in phases and selecting plants on the smaller side helps with the budget.
DeleteIt is looking quite lovely!
ReplyDeleteThank you!
DeleteWhat a great plan, Sandra! It already looks so much better than before, as well as the property glimpses surrounding! When you say you just finished Phase III, have you actually planted in July? We have had a drought since mid-June and it's all I can do to just water every day. It's been a very strange growing season, and I am bound and determined to keep all that I planted this year alive!
ReplyDeleteThanks, Rita, both she and I are pleased with it! Yes, we actually planted in July, though not by choice. We started in early April but missed the HOA's monthly meeting when they consider landscape changes. After they finally approved it, she was able to move forward with removing all the shrubs and fixing the irrigation line on that side of the house. The irrigation system was a plant-saver for sure, followed by a week of daily rainstorms. Everything looks good so far, but I'm keeping my fingers crossed!
DeleteYour plan for your MILs house is going to be beautiful. I am currently doing the same to our house. When we moved in there was mature, but merely adequate low maintenance landscaping. Nothing the at all interesting, except one beautiful silver maple, some sickly roses, and azaleas. We’ve taken out a lot of junipers. I’ve added many of the same flowers that you have, but it is a work in progress.
ReplyDeleteThanks, Michelle. Yards and gardens are always in flux, but having a plan makes the whole process easier to implement. Let me know how your landscape changes!
DeleteGreat job, lots of work with your garden. Love it.
ReplyDeleteFound your post on Whimsy Home Wednesday. My entries this week are numbered #31+32+33.
Hope you will join/share M-Sat at https://esmesalon.com/tag/seniorsalonpitstop/
Thank you!
DeleteGreat job! It is so nice to see an outdoor space come together in phases. My husband and I are currently working on our landscaping plans in phases as well and it really does require a lot of patience and persistence. Thanks for sharing this story at the link party. #HomeMattersParty
ReplyDeleteThanks, Donna! I think doing a landscape in phases is really the way to go. It can be overwhelming -- and expensive! -- to try to do it all at once. Phasing it also lets you see which plants thrive and which are too labor intensive to maintain.
DeleteWonderful look Sandra. So nice to see a plan come together.It takes time for the plants to grow and fill in. Kudos on a lovely makeover. I am happy to feature this landscape renovation at Love Your Creativity.
ReplyDeleteThanks, Linda, what a nice surprise! It's always disappointing at first to realize that you bought 50 plants that somehow seem to disappear in the landscape, then having to be patient while they settle in and start to grow. But we like the look -- so far, so good!
Delete